Setting up Autoresponders/Out of office

Contents
VPOP3 can generate automated responses when messages arrive in a user's mailbox. These are sometimes known as 'Out of Office' messages because that's the terminology that Microsoft Outlook uses. VPOP3 uses the more standard term "autoresponders" because they can be used for many things, not just to say that you're "out of the office".
When setting up autoresponders, take into account that they are usually very annoying to the original sender, and there are better ways of handling the situation (eg using role-based email addresses rather than personal ones - eg 'sales@..' instead of 'joe@...'.)
VPOP3 allows you to create multiple autoresponders for a user, and set the conditions under which they are used, for instance, you could set up holiday autoresponders in advance and have them activate & deactivate at the appropriate times, or you could have a different autoresponder for some users than for others.
To configure an autoresponder in VPOP3, as an administrator, go to the Users list, and double-click on the user in question, and go to the Autoresponder tab (or click on the ![]() icon on that user's row in the Users list)
icon on that user's row in the Users list)
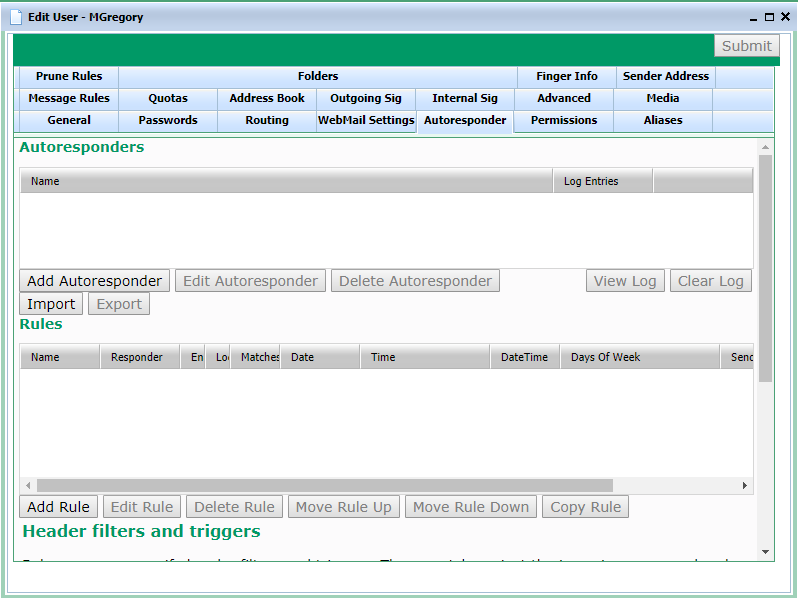
To create the autoresponder, click the Add Autoresponder button
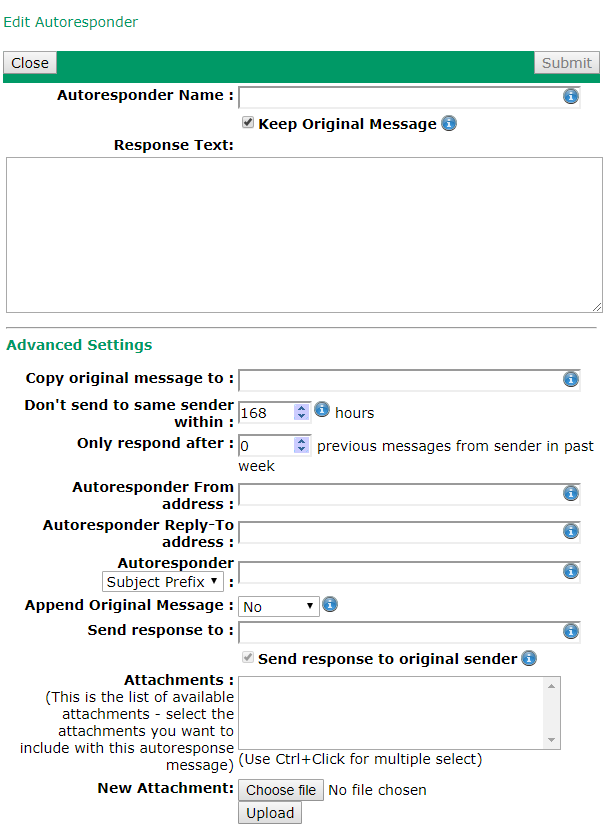
The Autoresponder Name is a name for your reference, eg 'receipt confirmation', or 'summer holiday'.
The Keep Original Message box should usually be kept checked. This tells VPOP3 to keep the original message in the user's mailbox. If the box is not checked, then the message will be deleted after it has been responded to.
The Response Text is the text of the automated response message. For simple cases, this is just what you want the reply to say. It is possible to use 'replacements' to dynamically alter the text. See the Reference Manual for more help.
The Copy original message to option lets you tell VPOP3 to send the original message to other email addresses as well (for instance, if the original recipient is on holiday, you may wish messages to them to be sent to other people as well). Note that this option is applied even if an automated response is not sent due to the following two options.
The Don't send to same sender within X hours option tells VPOP3 not to send an automated reply back to the same email address within the specified time. This is useful to prevent loops, eg where the sender has an automated response configured as well.
The Only respond after X previous messages option tells VPOP3 not to send an automated reply unless the same sender has sent at least the specified number of messages in the past week. This is useful because it often means that unimportant messages and automated messages won't generate responses, but if someone keeps emailing the user trying to get a response, they will receive the automated reply.
The other options let you customise header fields of the automated reply. See the Reference Manual for more help.
Once you save the autoresponder, VPOP3 will automatically create an Autoresponder Rule which defines when the automated response will be sent. This defaults to always triggering the autoresponder. There can be multiple autoresponder rules for a user. VPOP3 processes them from top to bottom, and only uses the first rule which applies to the incoming message. This lets you have multiple autoresponders, or set up exceptions to autoresponders (eg don't send an automated response if the message comes from a certain email address).
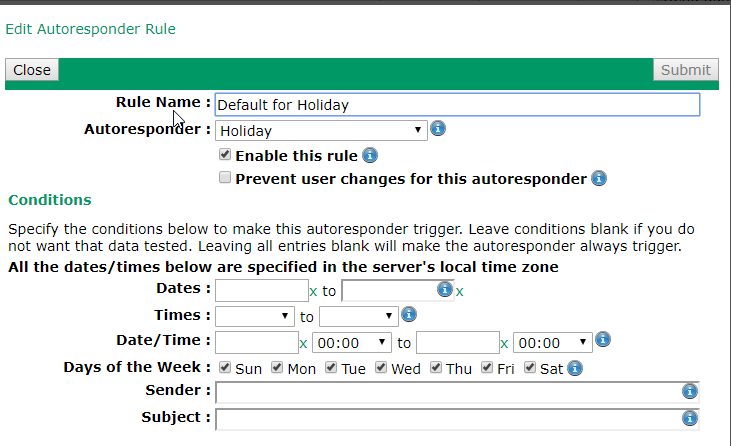
On this page, all the Conditions specify when the specified Autoresponder will be triggered. A common mistake is to fill in the 'Subject' box, thinking that will alter the subject of the automated response. In fact, it means that the autoresponder will only trigger if the incoming message contains the specified subject. If you want to alter the subject of the automated response, set that in the Autoresponder definition above.
If fields are left blank, then anything matches, so the default is for all the conditions to be empty, except the 'days of week' ones, which are all checked. If any fields are completed, then all the completed fields must match for the autoresponder to trigger.
The difference between the Dates, Times and Date/Time fields is that the Dates & Times conditions are applied separately, where as the Date/Time fields are grouped. For instance, if you set Dates to 1st April to 9th April, and Times to 9:00 to 17:00, then the autoresponder will trigger between 9:00 and 17:00 on 1st to 9th April (ie, it will not trigger at 18:00 on 2nd April). If you set the Date/Time fields to 1st April 9:00 to 9th April 17:00, then the autoresponder will trigger between 9:00 on 1st April and 17:00 on 9th April (ie it will trigger at 18:00 on 2nd April).