
This page lets you set up how VPOP3 gets incoming mail.
In How do you want VPOP3 to collect incoming mail there are three options:
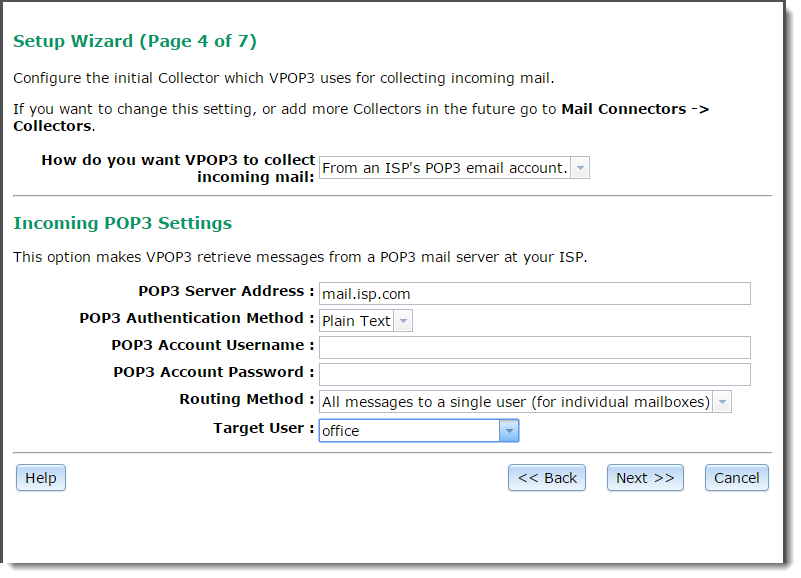
•From an ISP's POP3 email account - this is the normal situation with email for individuals or small businesses. Your ISP will have provided you with a POP3 mail server address and username & password details.
•Through an incoming SMTP feed - you can use this option if you have a fixed IP address and can set the MX DNS records for your domain to point to that IP address (see this knowledgebase article for more details)
•Using ODMR (On Demand Mail Relay/ATRN) - this option is provided by some ISPs for business accounts. You will know if you have to use this because your ISP will have told you.
From an ISP's POP3 email account
Use this option if your ISP has given you POP3 email account details. Note that the setup wizard only allows you to set up collection from a single POP3 account, but VPOP3 can download from many different accounts, you can set these up later in the Mail Connectors -> Mail Collectors section of VPOP3.
Enter the POP3 email account details provided to you by your ISP into the POP3 Server Address, POP3 Account Username and POP3 Account Password boxes. The POP3 Authentication Method option will usually be Plain Text, but APOP or CRAM-MD5 will be more secure if your ISP supports those options. You can change this information later by editing the Mail Collector in Mail Connectors -> Mail Collectors.
For the Routing Method, you can choose:
•Parse Message Headers - use this if the POP3 mailbox contains mail for multiple people - eg it is a catch-all mailbox
•All messages to a single user - use this if the POP3 mailbox contains mail for just a single user or email address
•All messages to a single user on another server - use this if the POP3 mailbox contains mail for just a single user and you want VPOP3 to send that mail to a different local mail server
Parse Message Headers

If you choose this option, VPOP3 will look at the To, and Cc message headers to see who the message is for. You have to tell VPOP3 which email domains it will accept mail for. This is so that it can ignore email addresses in the To or Cc headers which don't apply to you. Enter the domains in the Accepted Domains box, separated by semicolons if you have more than one domain's email coming into this POP3 account
All messages to a single user

If you choose this option, VPOP3 will send all mail downloaded from this POP3 account to a single user's mailbox. This is used when the POP3 account on the ISP only contains one user's messages.
Choose the mailbox for the messages to go to in the Target User box. (Note that if you are just setting up VPOP3 from scratch, you may only be able to select the default user here. You can change this later in Mail Connectors -> Mail Collectors.
All messages to a single user on another server
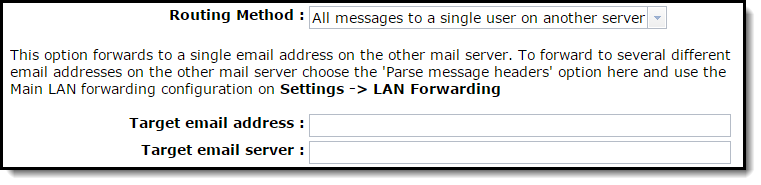
If you choose this option, VPOP3 will send all mail to a single email address on another local server. Use this if the ISP POP3 account only contains one user's messages and you have a separate server, such as Microsoft Exchange where you want messages to be sent to.
If the ISP POP3 account contains mail for multiple users, then choose Parse Message Headers and set up LAN Forwarding in Settings -> Local Mail -> LAN Forwarding.
Through an incoming SMTP feed

If you choose this option, then VPOP3 will accept incoming mail using SMTP. Note that VPOP3 will accept incoming SMTP mail in any case (as long as your firewall is configured to allow incoming SMTP connections), but using this option will tell VPOP3 to wait for incoming connections if using a dial-up connection, or trigger a remote server to start sending you queued messages by using the ETRN command.
If you want to have direct incoming SMTP without going through an ISP's server, then enter your email domains in the Email domains to accept box, and select Wait for up to "1" seconds
