
To set up an iPhone to access VPOP3's mail, you first of all need to configure VPOP3 to allow access by remote users (unless you will only be using the iPhone in the office, connected via WiFi to the office LAN).
iOS 12
These instructions apply to the iPhone & iPad and are for iOS 12. Instructions for a much older version of iOS are lower down the page
Note that there may be variations depending on whether you are using IMAP4 or POP3, have SSL configured on your server, exactly which version of iOS you have, etc.
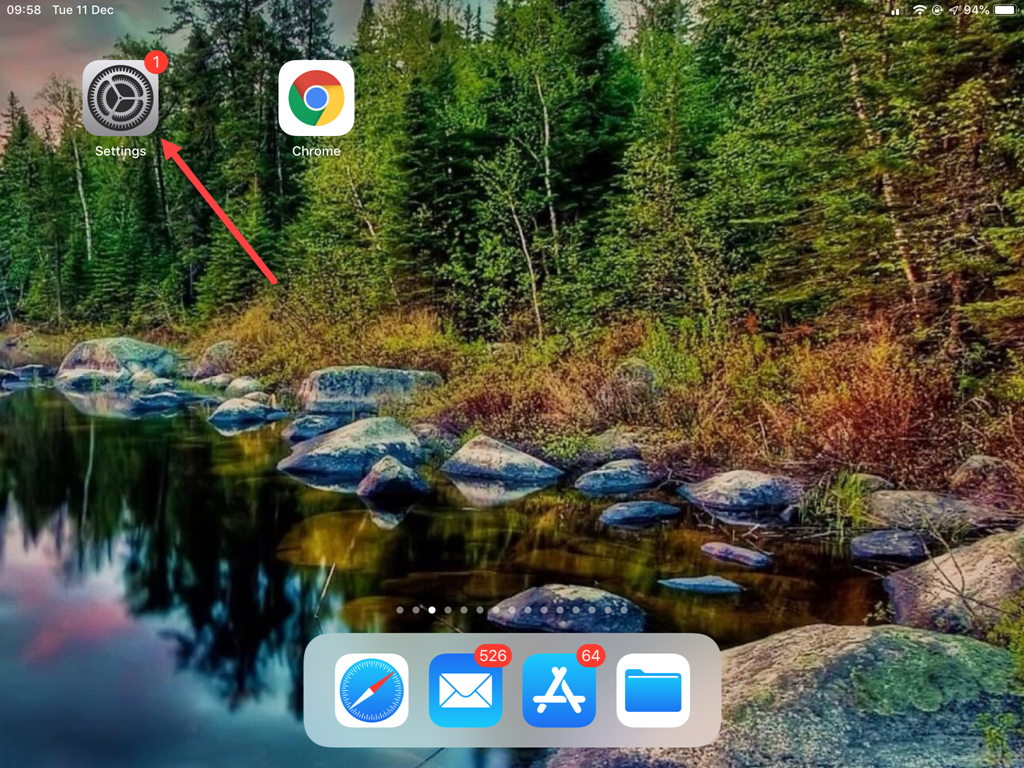
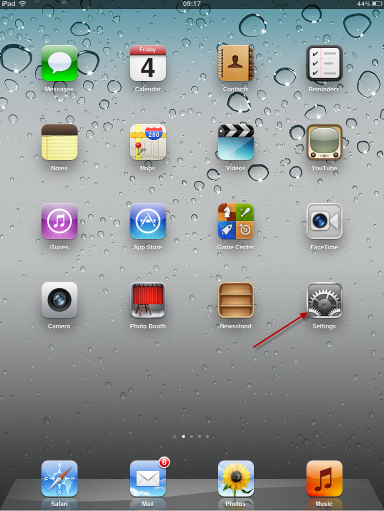
1.On the iPhone/iPad, tap on Settings
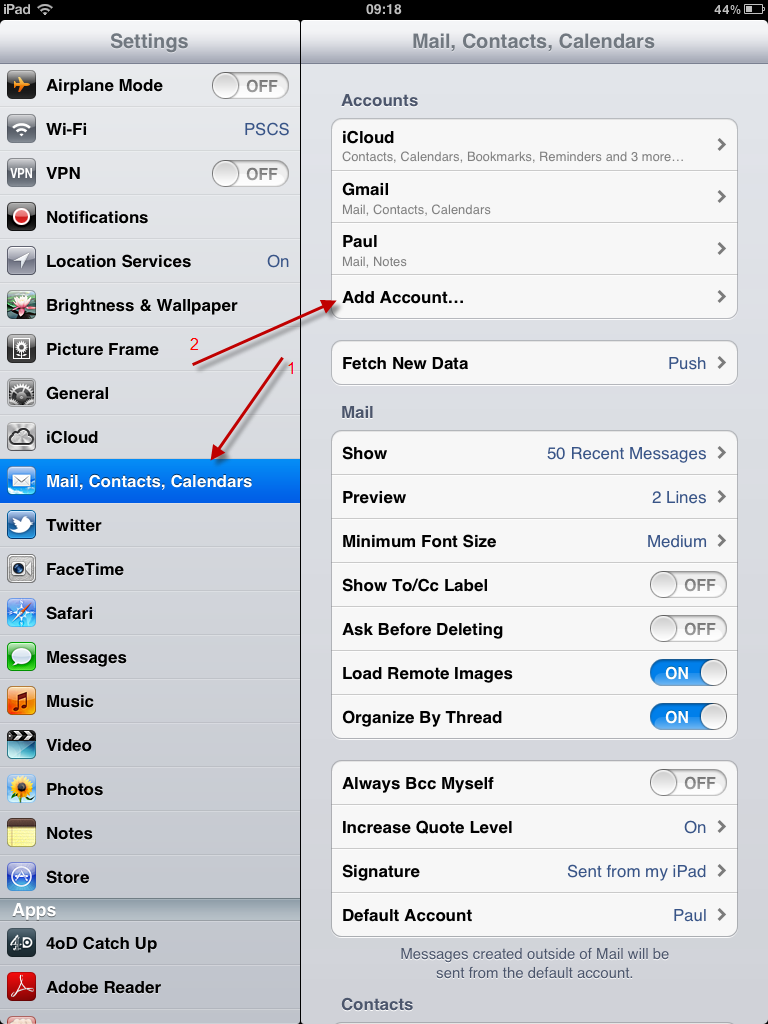
2.Tap on Passwords and Accounts
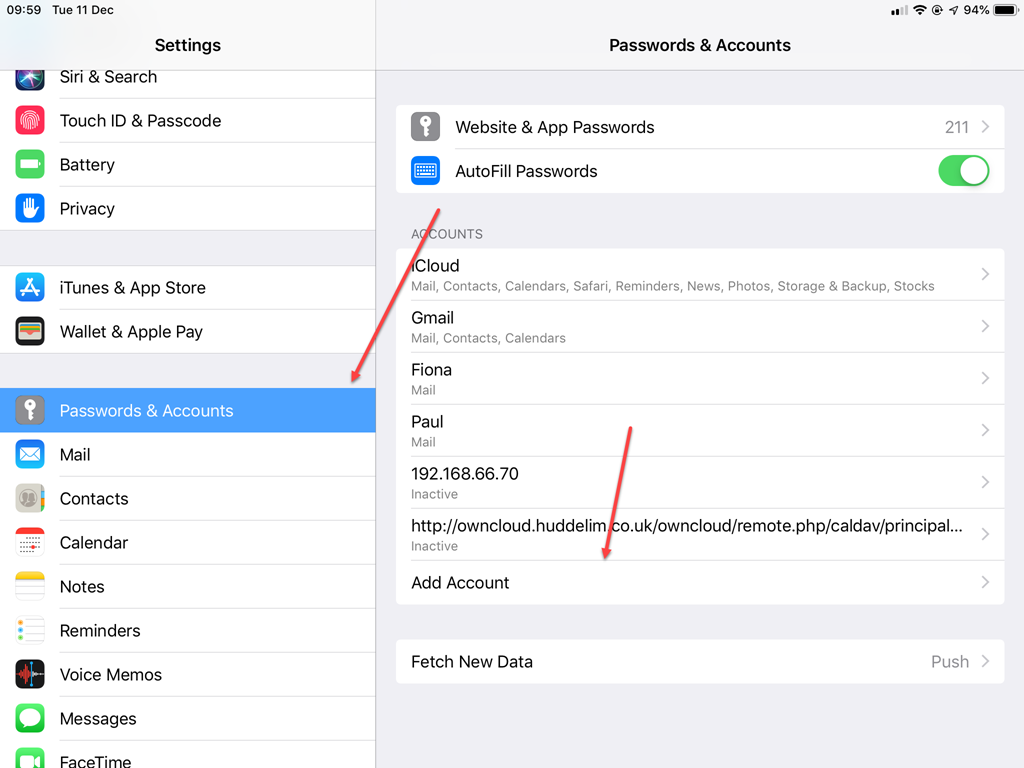
3.Tap on Add Account
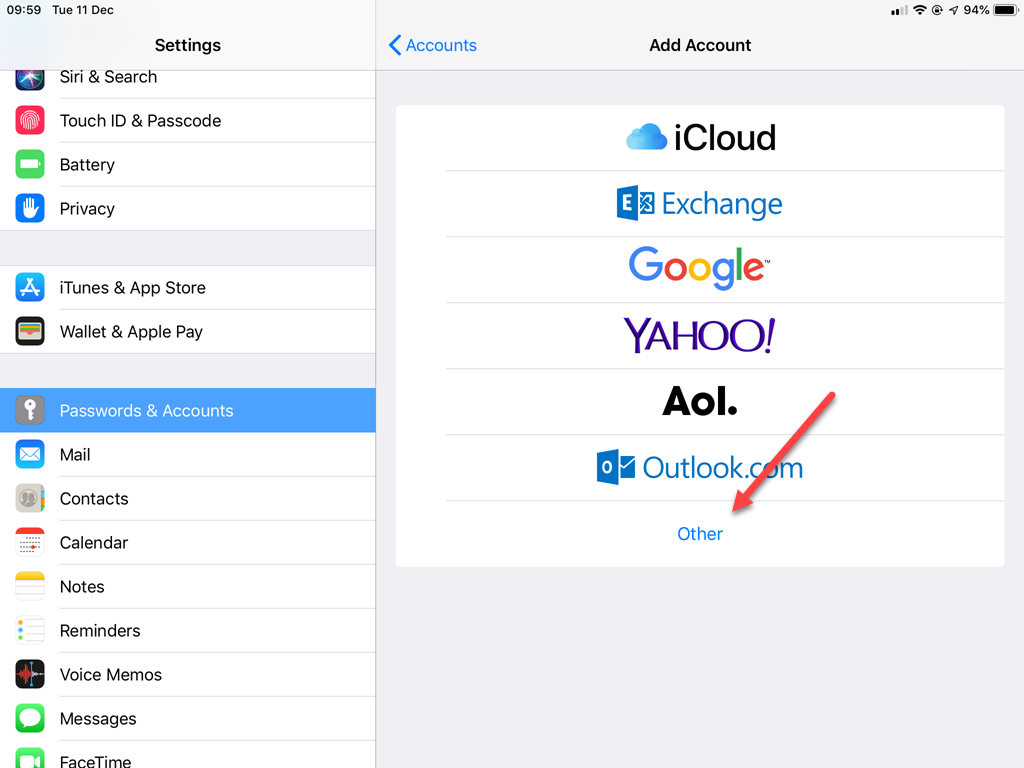
4.Tap on Other
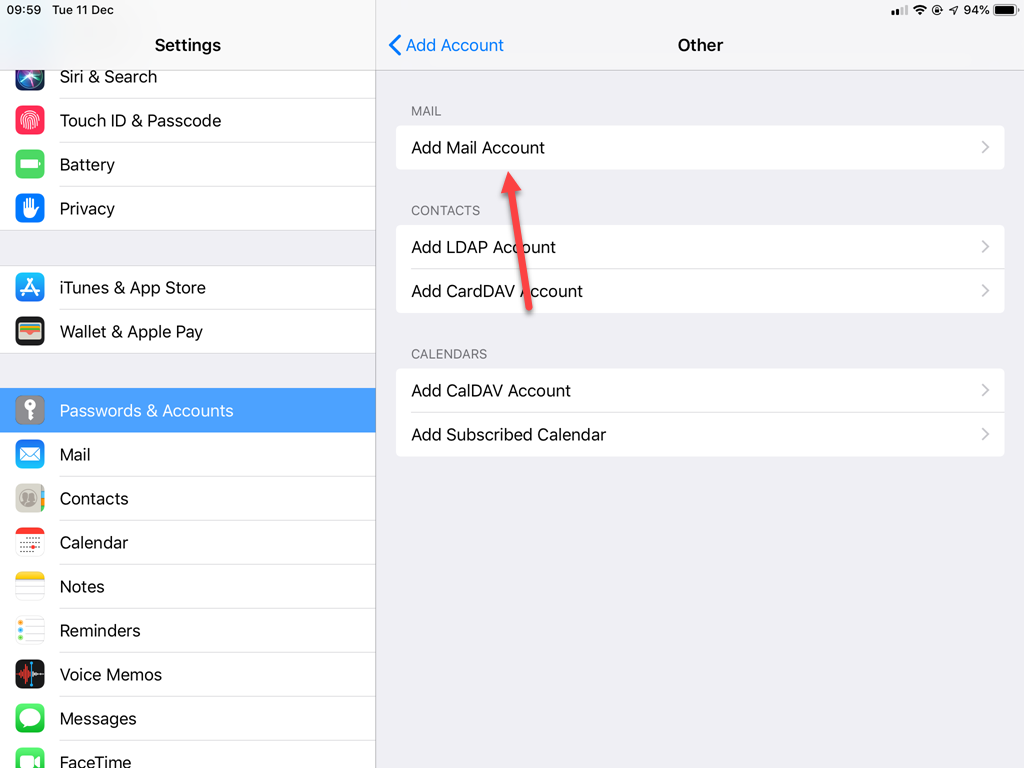
5.Tap on Add Mail Account
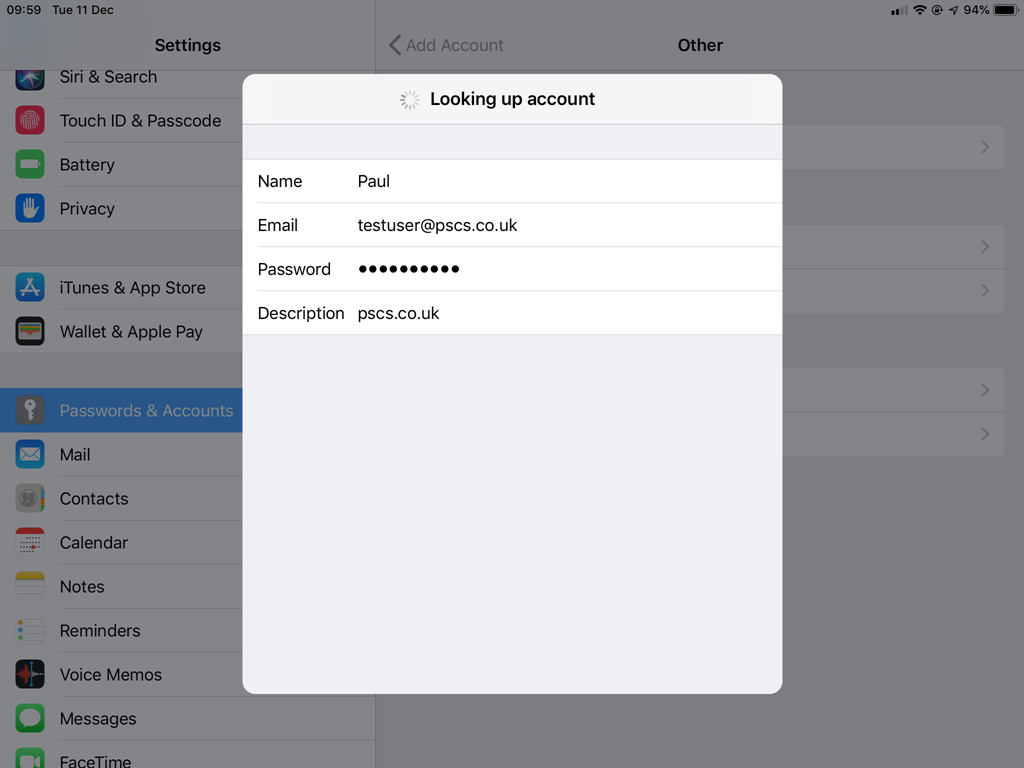
6.Enter your name, email address & password. Press Next

7.The iPad will say Looking up account. This can take a while and will probably fail to find anything, so be patient
8.The iPad will show a page where you can manually enter details.
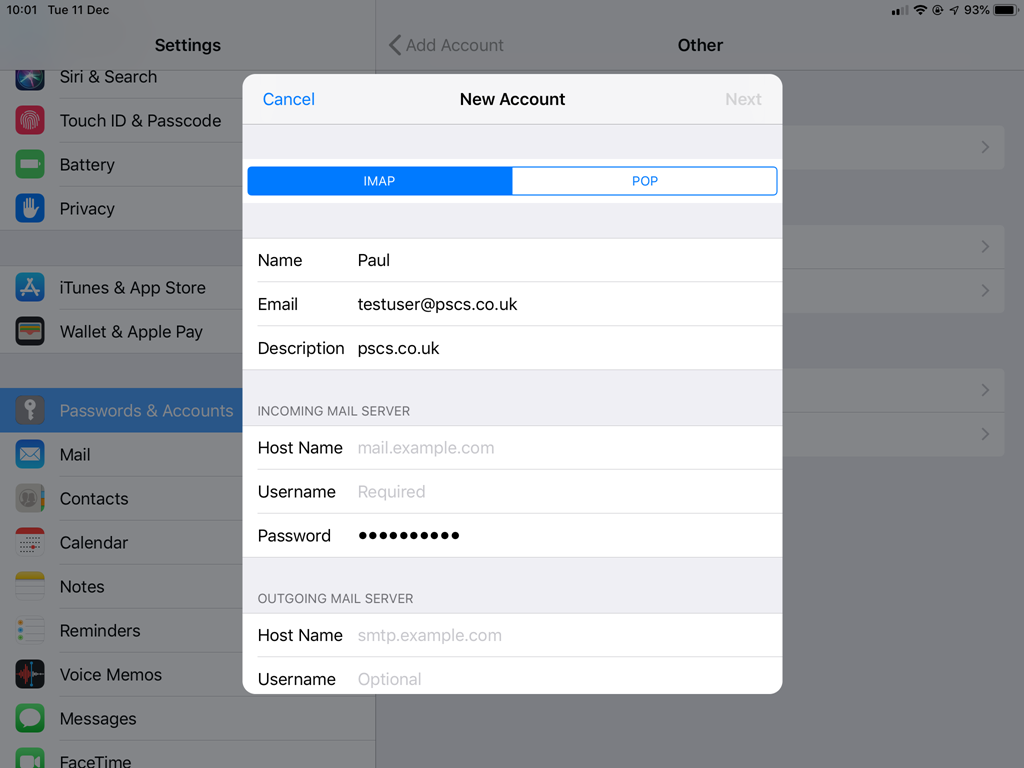
a.Select IMAP or POP as appropriate.
b.In the Incoming Mail Server section, enter:
i.The Host Name (the IP address or DNS name of the VPOP3 PC)
ii.The VPOP3 username & password
c.In the Outgoing Mail Server section, enter exactly the same details as in the Incoming Mail Server section
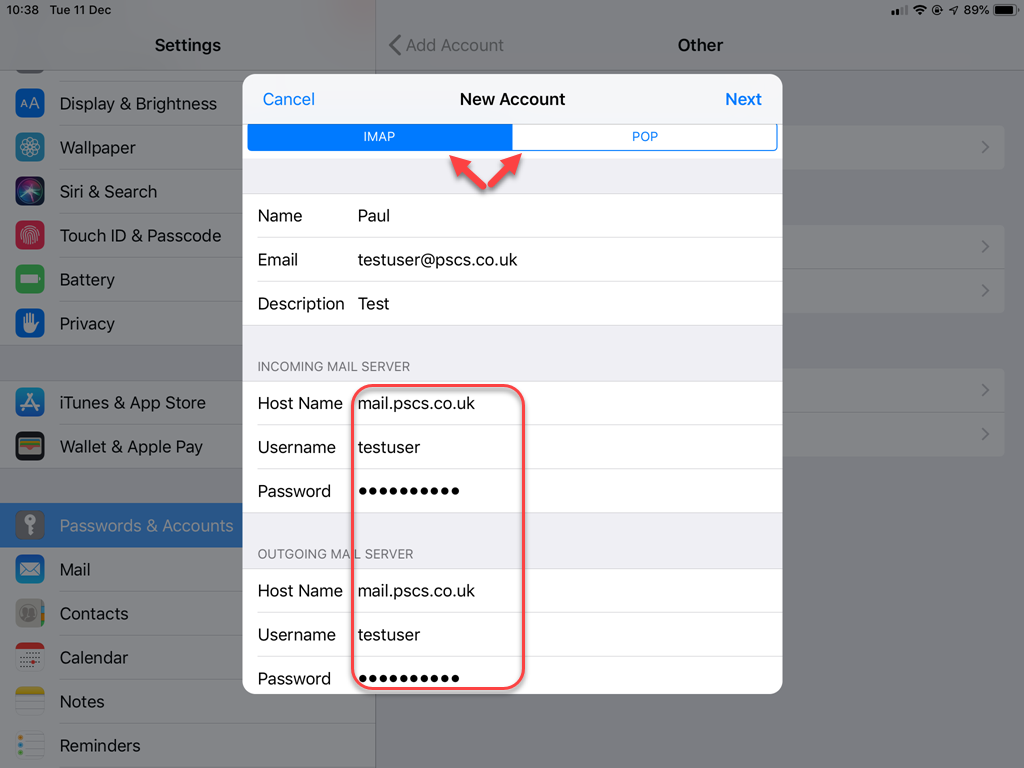
d.Press Next
9.The iPad will say Verifying. This can take a while, and will quite possibly fail. This is because the iPad is trying to connect to the IMAP4/POP3 server using 'alternate port SSL' (on port 993 or 995)
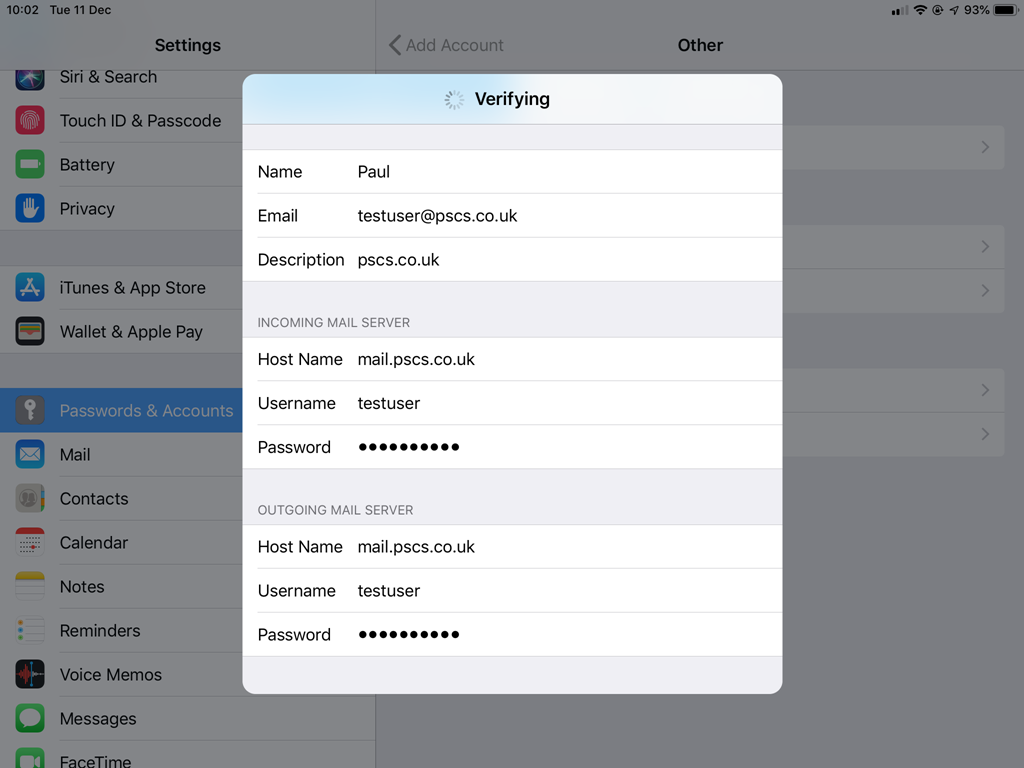
10.The iPad will probably say Cannot Connect Using SSL - Do you want to try setting up the account without SSL?.
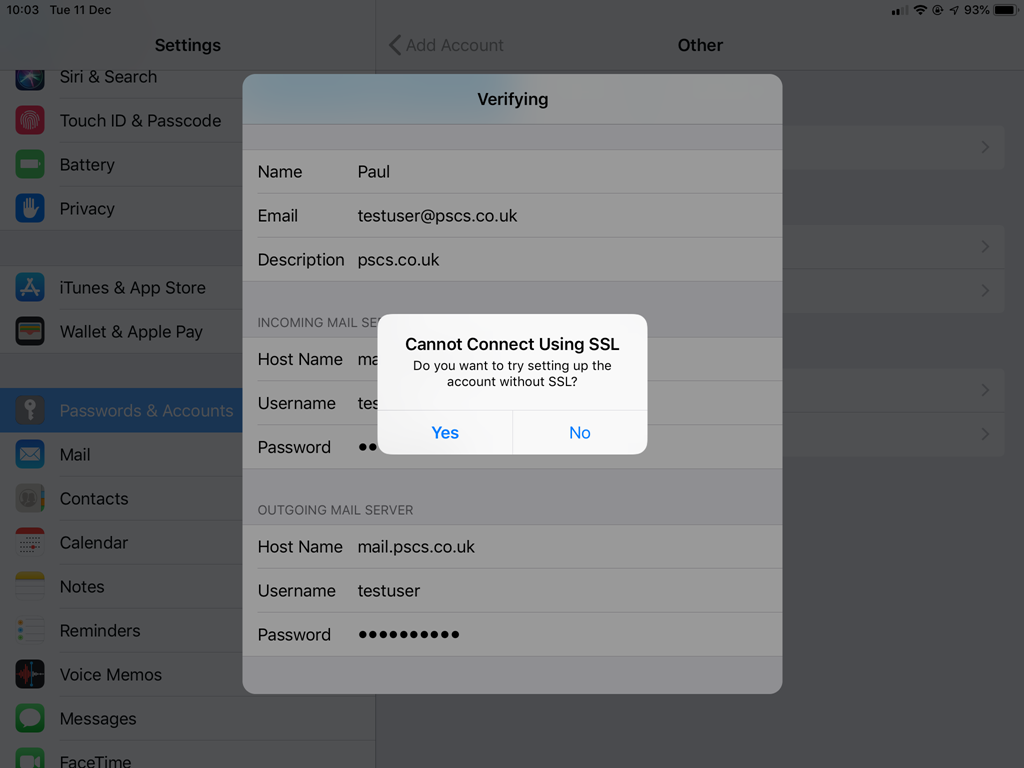
Choose YES, even if you have SSL on your VPOP3 server. This configures the iPad to use POP3/IMAP4 without SSL.
11.The iPad will say Verifying again. This can take a while. Be patient. This is while the iPad is trying to connect to the SMTP server using alternate port SSL
12.The iPad may say Cannot Connect Using SSL - Do you want to try setting up the account without SSL? (again).
a.Do not yet choose YES. We have found that the iPad sometimes tries to connect to VPOP3 using SSL when VPOP3 isn't expecting it. This means that VPOP3 gets lots of bad data which it can treat as a hacking attempt, so it may have blocked the IP address of your iPad. If it has, then if you tell the iPad to try without SSL, it will be rejected because the iPad's IP address is still blocked.
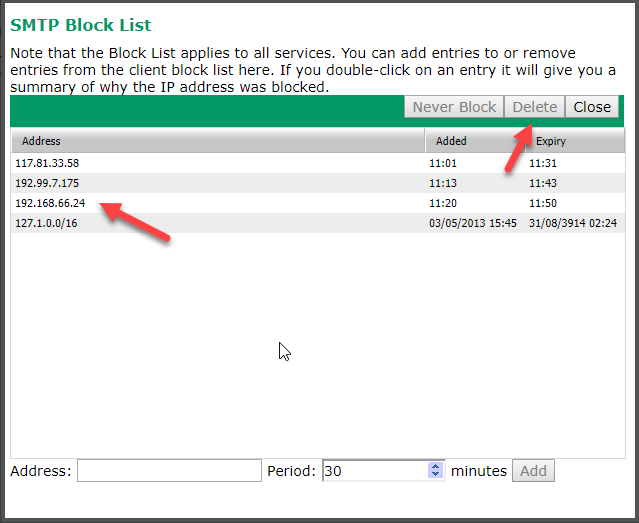
b.So, in the VPOP3 settings, go to Settings -> Security Settings -> Intrusion Protection. Click Manage Block List.
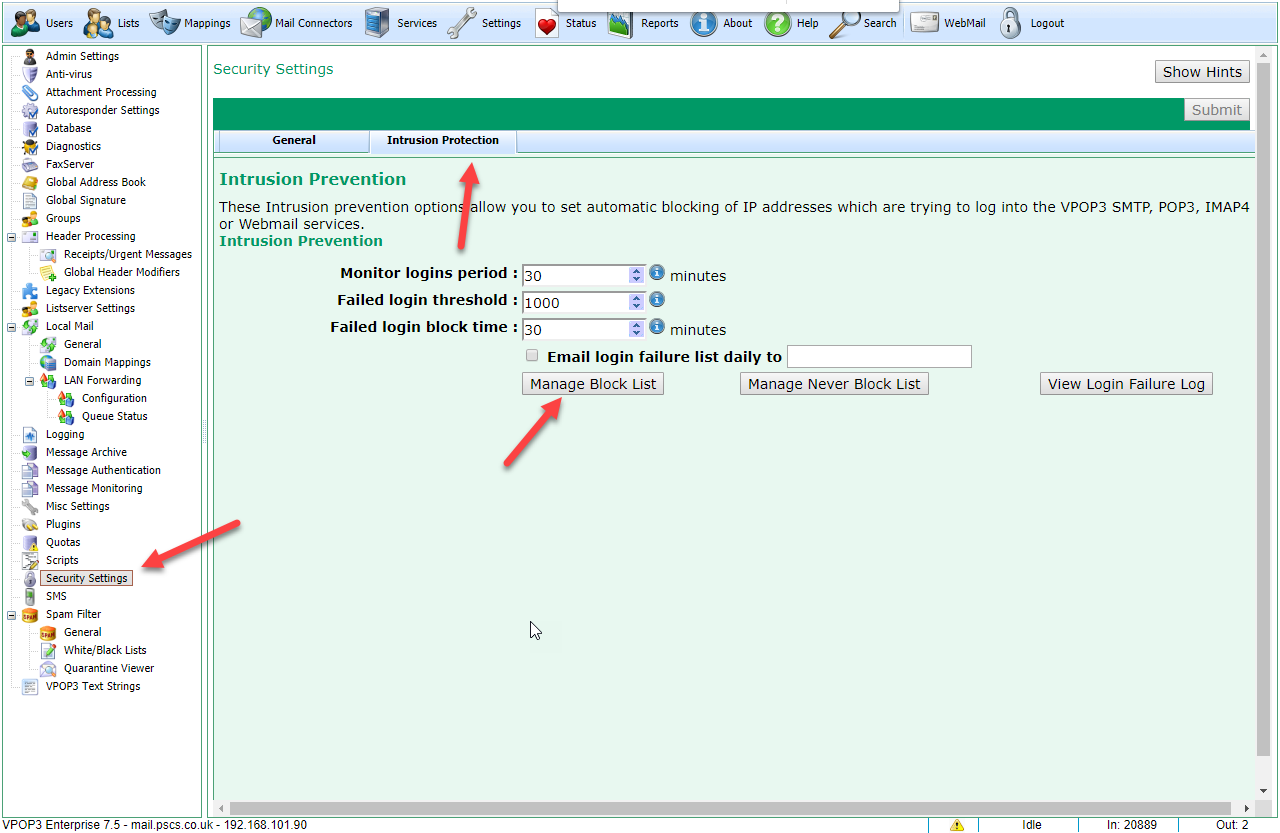
c.See if the iPad's IP address is listed there. If so, remove it. (if you're not sure, then remove all listed IP addresses).
d.Back on the iPad Choose YES, even if you have SSL on your VPOP3 server
e.The iPad will say Verifying again. This can take a while. Be patient.
13.The iPad takes you to another screen, press Save

14.If your VPOP3 does not support SSL, then that is all you need to do.
15.If your VPOP3 does support SSL using STARTTLS, then you may need to manually configure SSL. So:
a.In the iPad Account List, select the account you have just added
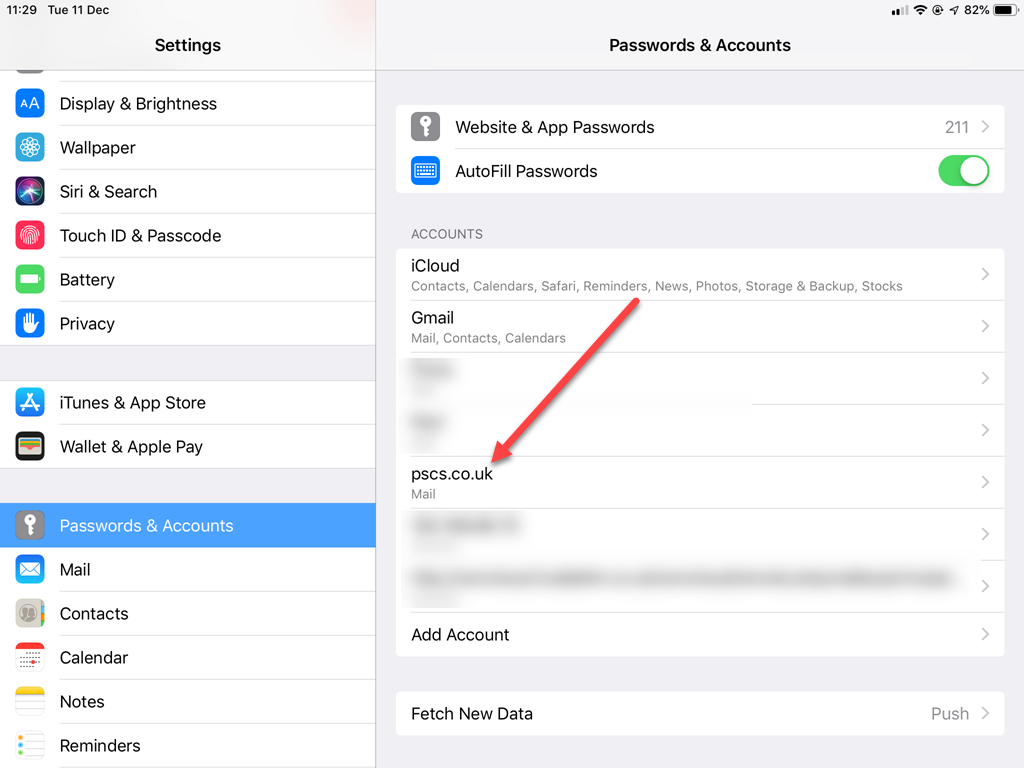
b.Select the IMAP/POP account
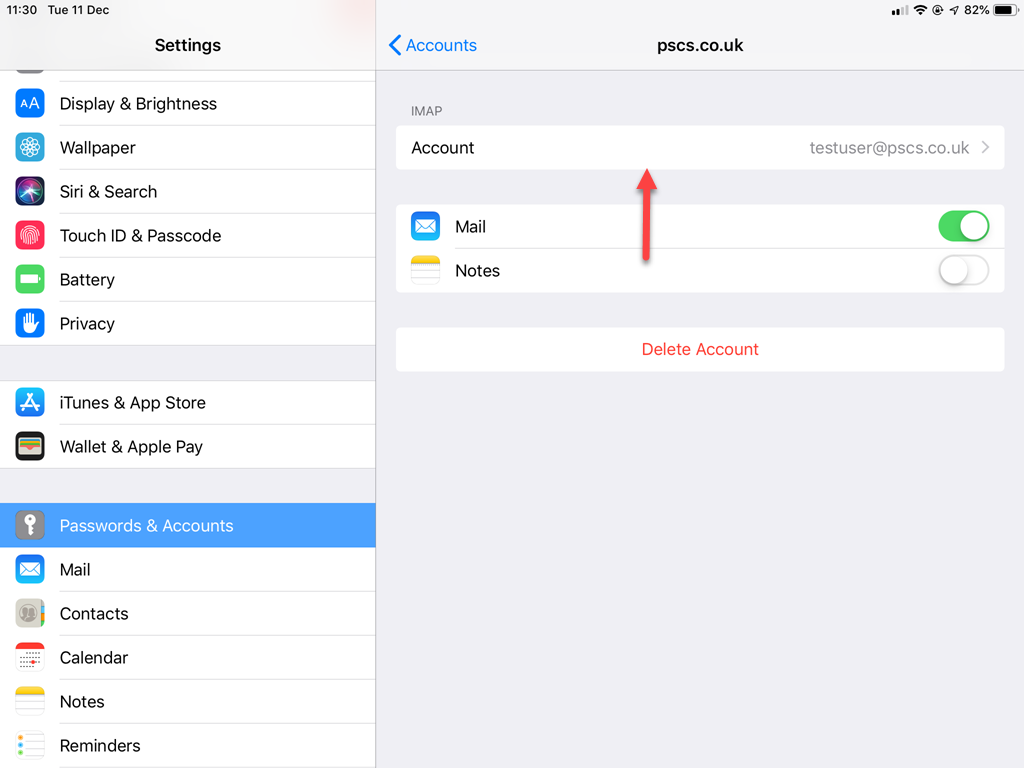
c.Tap on Advanced at the bottom
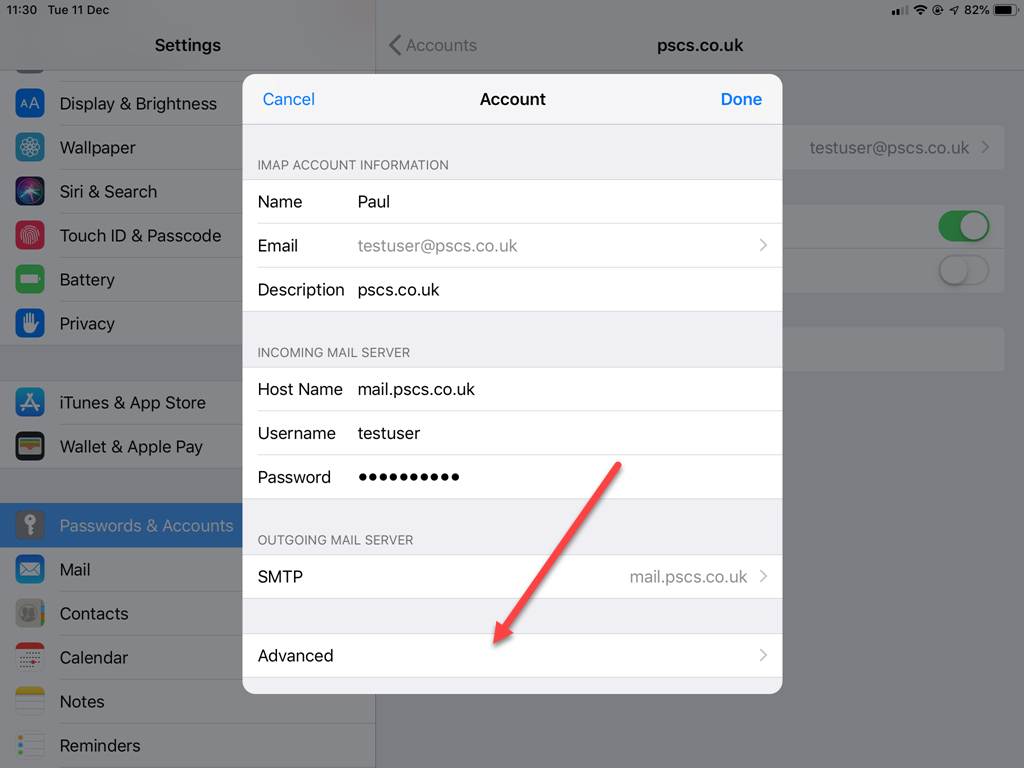
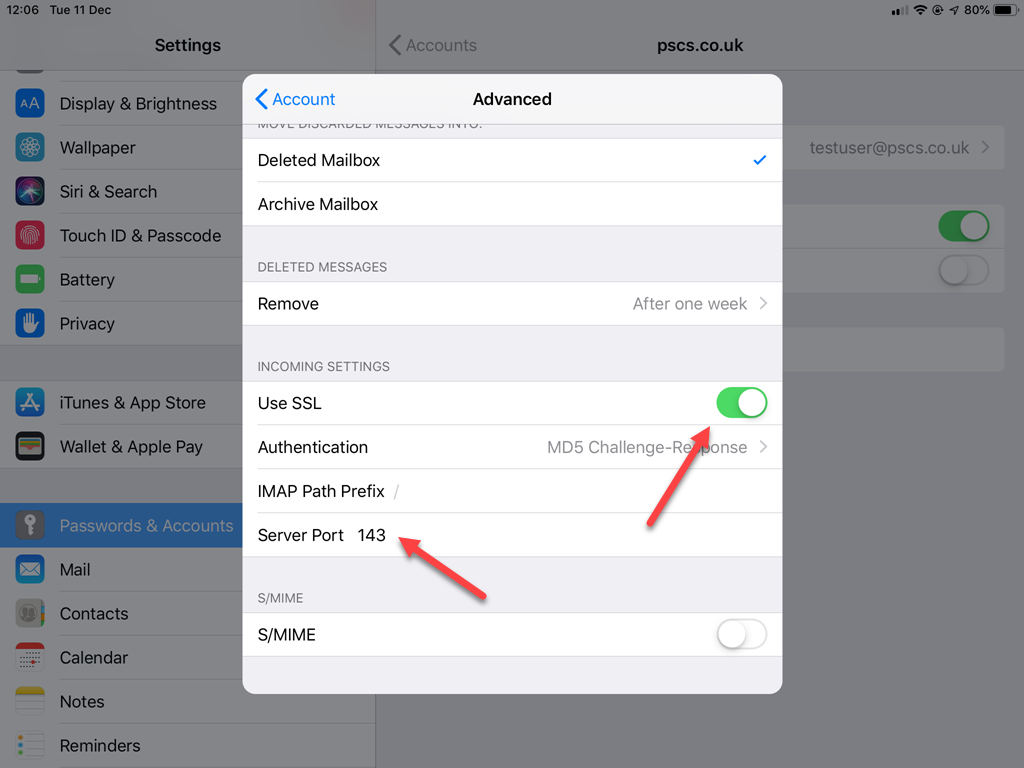
d.Select Use SSL,
e.Change the Server Port back to 143 (for IMAP4) or 110 (for POP3)
f.Tap < Account
g.Tap Outgoing Mail Server SMTP

h.Tap Primary Server
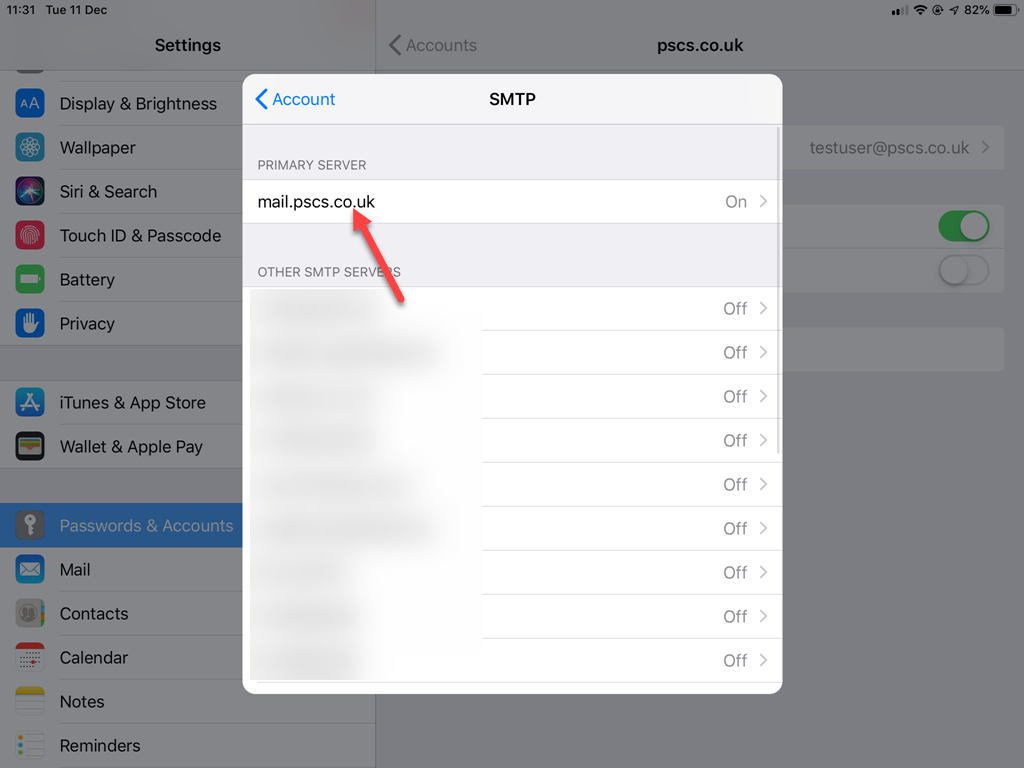
i.Select Use SSL
j.Ensure that the Server Port is set correctly (usually 587 or 25)
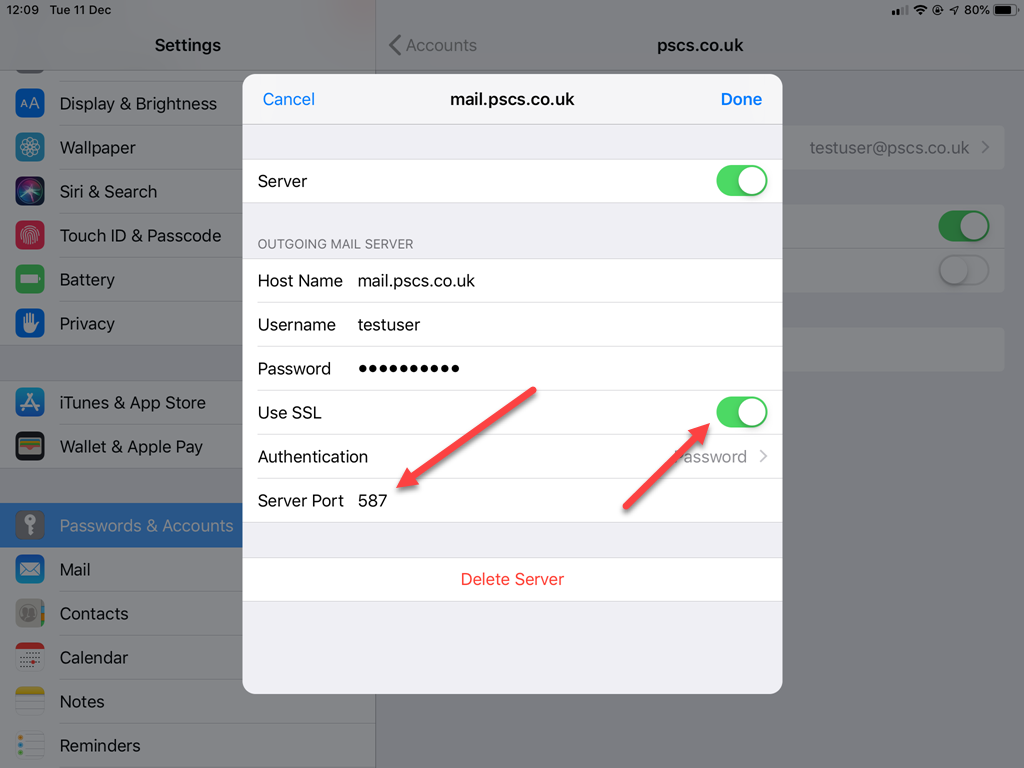
k.Tap Done
l.Tap < Account
m.Tap Done
iOS 5
These instructions apply to the iPhone, iPad and iPod Touch, and are for iOS5. Other versions of iOS should be similar.
On the iPhone/iPad/iPod Touch, go to Settings
Tap 'Mail, Contacts, Calendar', then 'Add Account'
Tap Other

1.Choose the Mail account type
2.Enter your Name, email address, VPOP3 password, and press Save
3.Choose IMAP (or POP if you have VPOP3 Basic)
4.Scroll down and fill in the Incoming Mail Server details
a.The Host Name is the the external IP address of your office network which is mapped through the router to the VPOP3 server (or the host name you have defined in your domain configuration which resolves to that address). See the IP address or name of the computer running the VPOP3 software topic
b.The User Name is the VPOP3 username (not the full email address)
c.The Password should already be completed
5.Scroll down and fill in the Outgoing Mail Server details. The details are the same as for incoming mail.
6.Press Save
7.If you receive a prompt saying “Cannot Connect Using SSL - Do you want to try setting up the account without SSL?”, select 'yes'. See below for further details.
For general advice on using mobile devices, see Using a mobile phone with VPOP3
IOS Mail and SSL
There are two methods to support SSL encryption in email. The current way uses the same 'port' as normal, and sends a command to start encryption, and an obsolete way uses an alternate port.
It appears that the automatic setup system for iOS mail accounts only handles the obsolete method, even though the mail client itself handles the current method as well.
So, to use SSL encryption, follow the steps below (yes, it is a bit dumb that this is necessary (other email clients handle this automatically), but talk to Apple about that):
1.During setup, tell your iPhone/iPad to trying setting up the account without SSL
2.In the Mail Account list, tap the account you have just added
3.Tap the line beginning with Account at the top, to edit the account settings
4.Tap the Outgoing Mail Server SMTP line
5.Tap the *Primary Server line
6.Select the Use SSL option
7.Ensure the Server Port is correct - usually either 25 or 587 as appropriate (not 465)
8.Tap Done, and <Account
9.Tap Advanced at the bottom
10.Select the Use SSL option
11.You will note that the 'Server Port' has changed to 993 now. Change that back to 143
12.Tap <Account and Done
